Showing posts with label Basing. Show all posts

Friday, 16 April 2021

Kharadron Overlords Update - February 2021

Hello Friends,

My hobby has continued to thrive during the COVID-19 pandemic as I’ve had lots of extra time to work on various projects. The most prominent of these since my last update has been the completion of a solid Vanguard-sized force of Kharadron Overlords.

I continued the approach that I took with the test models, and all of the infantry models were done with an old-school handpainting and layering approach. No contrast paints or airbrushing to be found! I also really enjoyed the cohesiveness of the neutral palette I’d selected.

However, when it came time to do the boats I decided to make use of the airbrush because I’m not a total masochist, and I also found the need to add one more colour to the palette to employ on the huge swathes of their hulls. I went with a dark turquoise based on Citadel’s ‘Incubi Darkness’ that I think works really well and ties into the sea-theme of the bases.

The beach bases were a lot of fun to do and help to make the army quite distinct. I used Vallejo water textures and exactly followed the excellent guide on water bases by Tsukuru_Paints that can be found on their Instagram here.

My personal favourite of the water bases.

I continue to really enjoy cracking out these small 1000 armies. It is particularly satisfying with the Age of Sigmar range, as something about the brilliant level of variety between the AoS sculpts and the flexibility of their potential color/basing schemes is super satisfying to me. A Vanguard force is also a manageable number of models that seems to be around the perfect amount for me to paint before I’m ready to move on to something else. I get to focus new techniques, styles, or material, and after a few test models get to see how they play out on an army-level scale across a variety of models.

A frothy boy!

There’s been lots more going on with my hobby lately, with many more exciting posts to come! Thanks for looking!

-Tom

Friday, 16 June 2017

How to: Paint a Mosaic Resin Base

Hello friends!

I don't think I've ever been as happy with my basing as what I've developed for my Haqqislam Infinity forces. These bases are  satisfying to paint, look fantastic, and best of all are quick and easy to do! The techniques I use here can be employed for any sort of textured resin base, and I hope you find them useful!

For this army I'm using the Micro Arts Studios 'mosaic' resin bases. These are great quality casts with some lovely subtle texture to them that this process really brings out.

Step #1: Select bases and drill holes. First I choose which base will be used for which figure. Situate the model on it during assembly and drill holes in the base to mark where the pins will be. I note which figure goes in which slot by writing in permanent marker on the underside of the base. Then undercoat the bases with your preferred color using a rattlecan, I went with Games Workshop's "Mournfang Brown" spray.

Step #2: Base colors. Using an airbrush I went over the entire base in with Vallejo Model color's "Sand Yellow". It took about 3 coats to get a nice strong tone across it, working off of a brown undercoat. I then used a brush and painted sections of the mosaic using Games Workshop's "Stegadon Scale Green" and "Doombull brown".
Bases after step two.
Step #3: First layer of shade. I used Scale 75 "Inktense wood" wash through the airbrush to get this first layer. I sprayed this almost parallel to one section on the side of the base in order to have the ink catch the raised edges of the base texture. The Scale 75 washes are very strong and even with this limited usage you get a lovely tint out of the base layer of paint.
These are the same bases after the first shade. Note how there's a lot more ink on the side of the base in the top right than there is on the base itself. This is because I only wanted it to skim the top and was spraying most of the ink on the side of the base to help control the amount going over the top.
Step #4: Second layer of shade. I used the exact same airbrush technique only this time using Army Painter "Strong Tone" wash, which is a very natural tone to bring everything together. Once again I focused my spray against the side of the base in the exact same spot as the previous shade in order to only skim the top of the base and draw out its texture.
Bases after step three.
Step #4: Detail work. Once the second shade has fully dried, paint the rims of the base black, and do some edge highlighting around only the outer rim of the base to make things pop a bit. I didn't bother doing any edge highlighting inside the base as I knew I was about to use pigments anyways.

Step #5: Varnish bases. This is really important because we'll be wiping the bases down with water when we use pigments and the inks and washes will absolutely be wiped off in the process if you haven't varnished it. I used Army painter "Aegis suit" rattlecan varnish but you can use any sort of satin or gloss varnish that offers decent protection against water.

Step #6: Pigments. Use vallejo's "Burnt Sienna" pigment and mix it with a bit of water to get it nice and sludgy. It should be thick enough that it doesn't run when you put it on a flat surface, but runny enough that it still falls into and fills the gaps of the bases. Using a cheap brush you slam this mixture into all the crevices of the base. Have fun and be as messy as you want, none of the pigment on the surface will be staying there.
Bases after step six. Pigment spackled into the cracks.
Step #7: Wipe away the pigment. This is the funnest part of the process! Dampen a cloth or piece of paper towel a bit and literally wipe off the tops of each base. After 1-3 passes all of the pigment on the surface will have disappeared but the pigment in the cracks will remain. Your varnish will protect your previous work from getting wiped off. It's sooooo satisfying.

However you need to ensure the previous layer of pigment has completely dried, preferably overnight, before doing this. Otherwise you might remove some of the pigment in the cracks!
Finished bases after the pigment has been wiped away.
Step #8: Final varnish. After giving the remaining pigment another chance to fully dry (it doesn't need quite as long this time) you should do one more layer of varnish to set it in place and voila, mosaic bases! The varnish will also help protect your work if you decide to paint your figures after they're attached to their bases as I do. Any stray paint that gets on the base can be wiped off with water without issue thanks to the varnish.
My test model getting painted on top of a completed base. Looking good!
These techniques should work well for any sort of textures resin base! I hope it has proved useful!😄

Update XI: Haqqislam Forces, Test Schemes, and Chipping Experiments

Hello friends!

It's been a little under two months since my last update so I thought I'd let you know what I've been up to hobby-wise since the start of May.

1. Finished getting my Infinity JSA army tabletop-ready.

First I focused on finishing the bases and getting an airbrush and some base layers down on the two remaining models for my JSA forces. With a layer of varnish these two were up to snuff with the rest of the army and ready to use on the tabletop while I finished their brushwork.

My Oniwaban proved to be an incredibly effective attacker in my first two games with him. Really cool high-risk/high-reward unit!
However instead of being satisfied with my JSA army and getting down to finishing them off with brushwork I instead completely shifted gears and began assembling and prepping a non-sectorial (aka 'vanilla') Haqqislam force.

Even now it's entirely unclear to me why I did this beyond liking the faction and having the Red Veil forces available to me. I really am a glutton for punishment...

2. Assembled and started prepping a Haqqislam army for the tabletop.

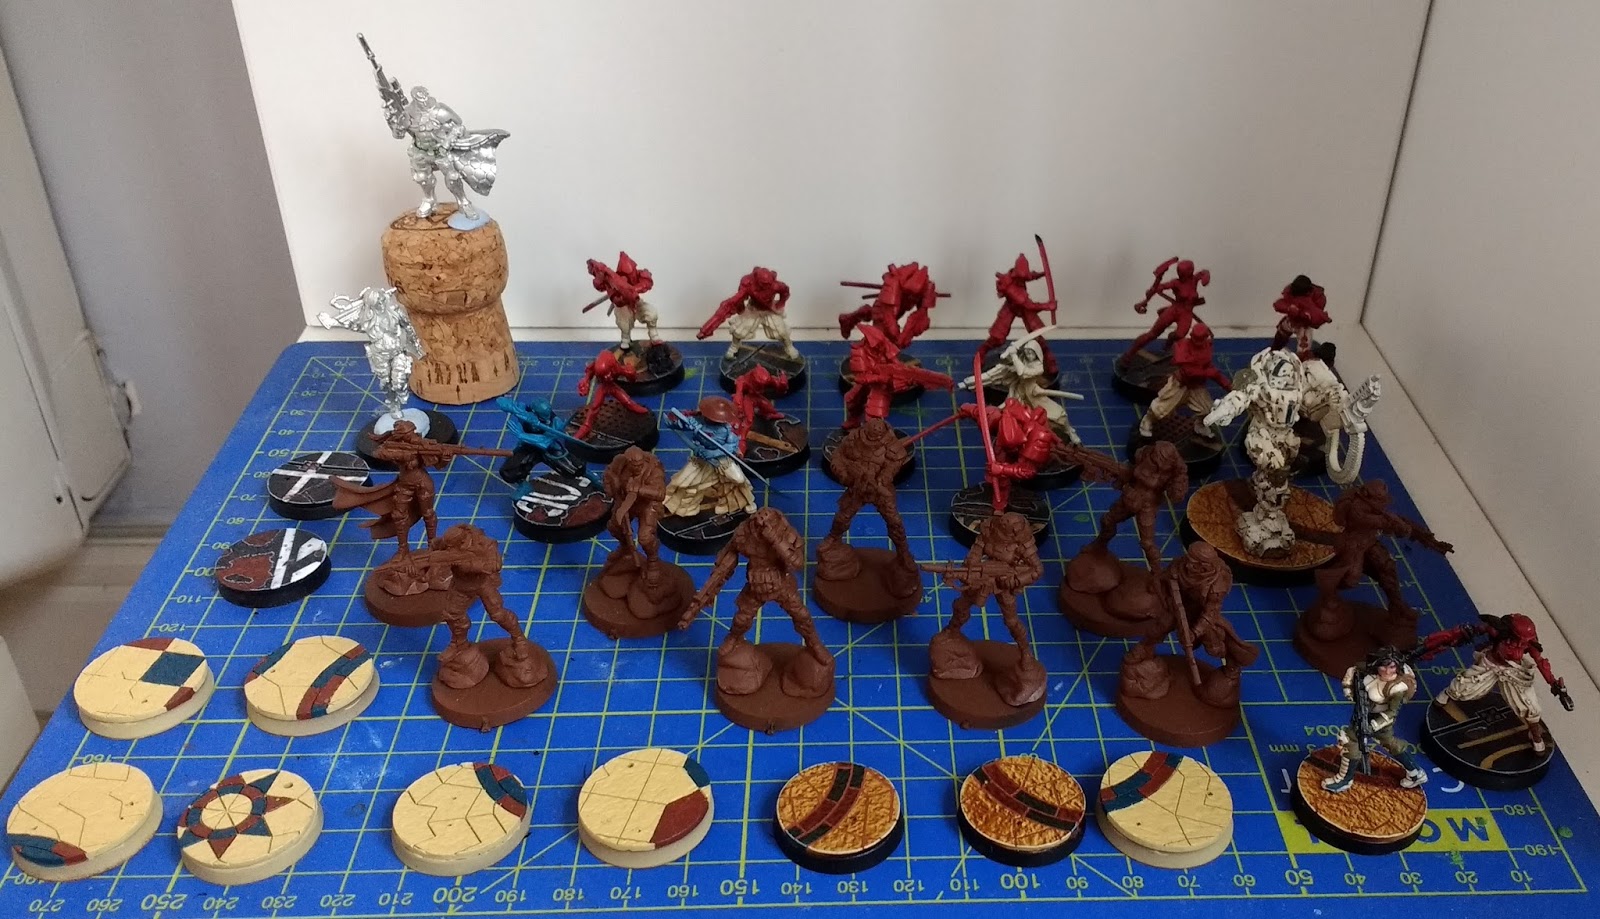
I supplemented the red veil box with a box of naffatuns and this, in tandem with the Knauf mercenary sniper I got with the recent infinity Manga, will make a solid 300 point Haqq list. However it added about thirteen more figures to paint on top of my eleven JSA units.

The current painting backlog, about 24 figures. :/
Consequently instead of having one finished army I now have two partially finished ones and lots of brushwork to do. Thankfully the Haqq bases are now almost entirely done and the figures are airbrushed so at least I'll be able to use both on the tabletop.

3. Initial models for both JSA and Haqqislam armies

Once I settle on a color scheme for an army I always get an initial test model to at least 70% completion with the colors I've chosen so i'm aware of any particular challenges that the combination of paints or colors might offer me. For my Haqqislam forces this was a female Ghulam line trooper.

Initial basecolors down over a completed base. I've uploaded a detailed basing tutorial seen here.
Haqqislam troops look somewhat less "high-tech" than other factions and I wanted to use earthy tones to reflect that realism while still keeping the colours bright and punchy on the tabletop. I settled on cream-coloured armour with green clothing  accompanied by some dark blue spot colours.

Working on this model proved really useful, particularly in regards to how to approach the cream armor, as I realised that doing white zenithal highlights on the airbrush beforehand was a pointless step. Definitely a time saver in the long run!

I also made my first attempt at doing a really simple NMM effect with two shades of metal over the black basecoat on the weapon. I am SO pleased with the result, which actually a lot faster than doing a full bascoat of true metal. This is probably the first time I've felt like my metal tones look good.
The current state of the model after further work. Armor and weapon are basically finished here but the skin, green, and blue have all yet to have any highlight/shading.
Rear view.
I'm definitely really pleased with the overall effect of my color scheme and it's been a lot of fun to paint.

I had already got to this point with a JSA test model, but continued to work on the Doctor figure in order to finalise my approach. I'm only somewhat happy with the result but this told me a couple things about the process that i'll keep in mind for the remaining figures. Specifically how to approach highlighting the puffy pants and also that the red armour doesn't really need a glaze to get the most out of it.

Front view. Armor, weapon, and pants pretty much done here. Skin, hair, and brown spot colors need a lot more stuff going on .Haven't evne gotten around to base coating some of the straps yet.
rear view
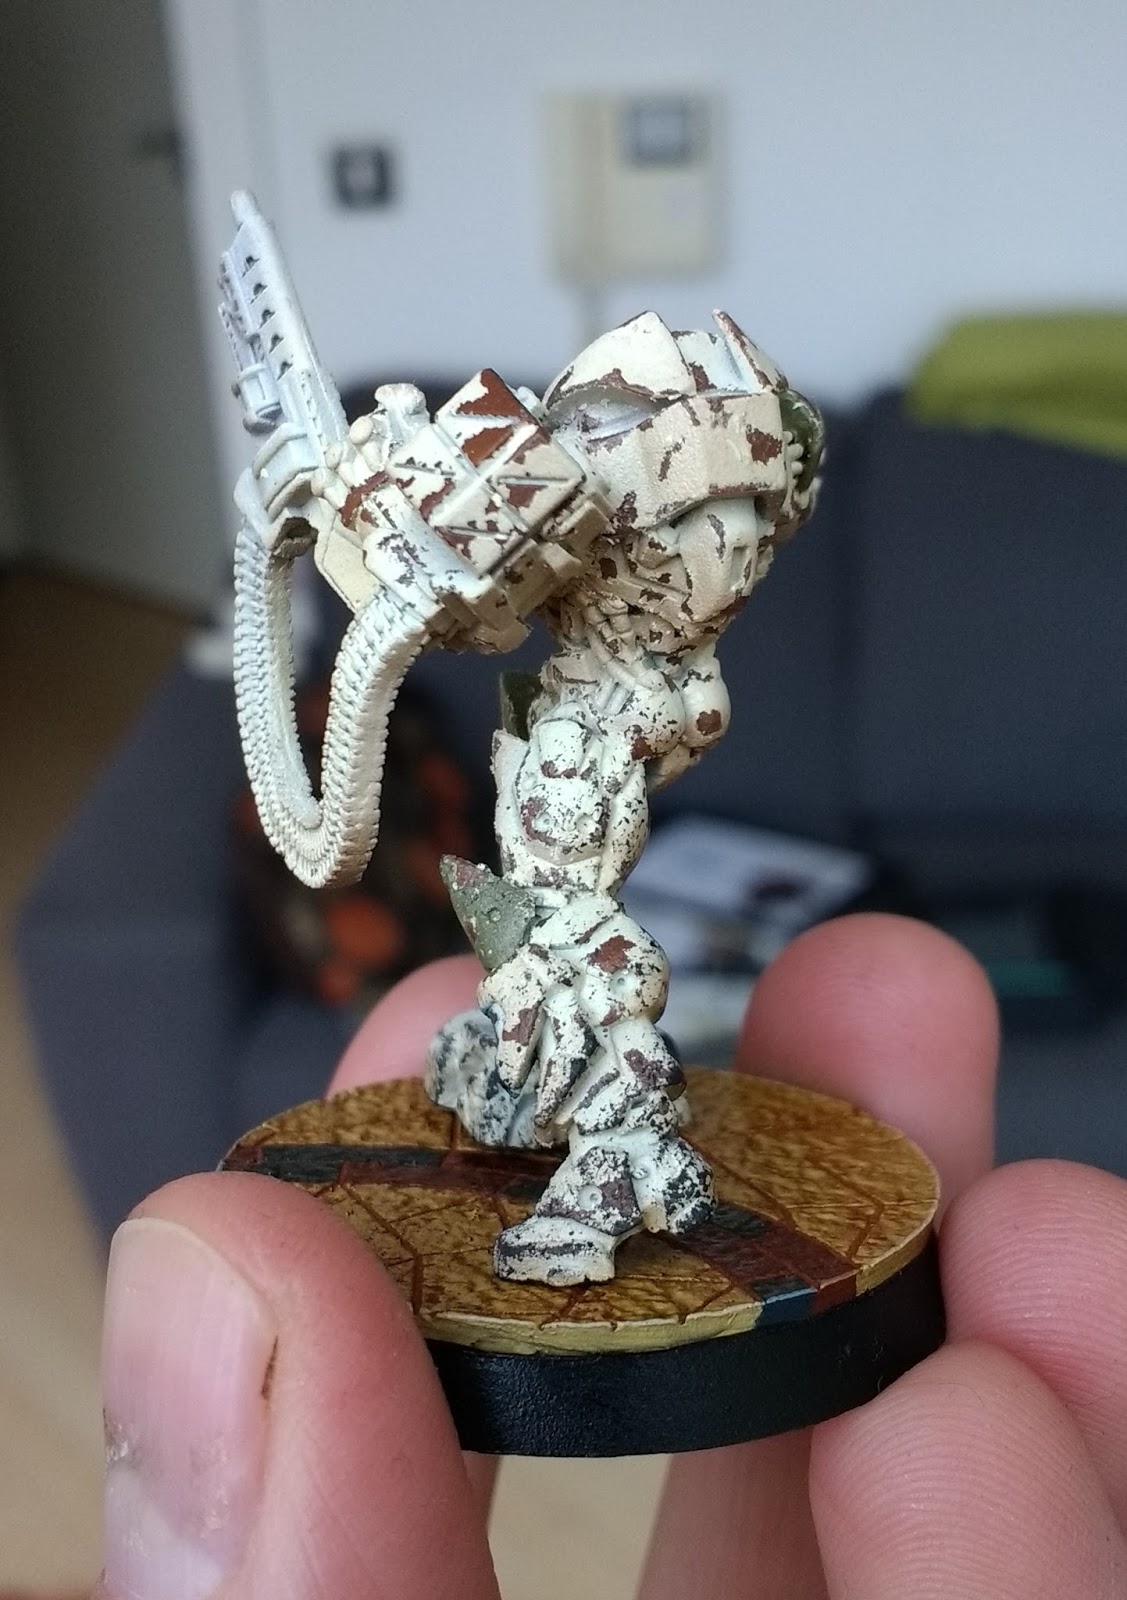
4. Chipping experiment on Haqqislam Heavy Infantry

One of the Haqqislam units from the Red Veil box is encased head-to-toe in armour, and I wanted to try something different to set him apart from the others. I decided to use some chipping medium to give him a really weathered look as I'd done on my Gorkanaut around this time last year.

I won't go through a detailed step by step process but I undercoated him with a rattlecan, then sprayed him down with "doombull brown" through the airbrush. I varnished that layer, and then gave it two coats of Vallejo's "Chipping Medium" which comes in a dropper bottle.

Over the chipping medium I airbrushed him with the cream colour from my colour scheme, along with some basic airbrush zenithal shading and highlighting.

How he looked before I started chipping.
I did some spot colors using the greens and blues from the rest of color scheme to add some flavor, and then began the chipping process.

I started using water and a toothpick to chip away at the top layer. However I quickly became very frustrated with the way the Vallejo "chipping medium" behaved.

With the Gorkanaut I had used AK interactive "Worn Effect", which is used the exact same way as chipping medium. However the AK interactive effect has a lot more grip, and while it takes a lot more effort to remove the top layer of paint, it gives you lots of tiny chips which makes for a really realistic rust effect. I ended up using a toothbrush to rub down my Gorkanaut and I was really pleased with the effect.

Unfortunately with the Vallejo chipping medium it was way easier to take off the top layer, so that my initial use of a toothbrush took off almost all of the colour on the side of his right leg. It was very frustrating and upsetting. After letting it dry and fixing up the leg as best I could withe some sponging I stuck to using a toothpick and carefully picked off large flakes of the armour. The takeaway here is that Chipping medium gives you very big chips.

The result doesn't look very natural and makes him look "spotted" rather than actually worn down from use. I can see chipping like this looking fine on tanks, but on an infantry model at this scale you really need to use something else if you want a realistic worn effect with lots of little chips. Another possible solution is to only use one layer of chipping medium rather than two, and also spending more time in the chipping process to get it looking more natural. I admit I was so disappointed I sort of rushed this a bit.

The same model after the initial chips, note the fixes on the side of his right leg from where I took off too much of the top layer.
Thankfully this guy isn't my favourite model ever and I don't expect he'll be getting a ton of table time once my forces expand, so I was happy to just say "lesson learned" and move on. I did give him a bit of sponge weathering before gluing him to his base, and I plan to give him some oil washes which will help tie in the overall look and make things a lot more natural.
After some sponging on the legs and being glued to his base.
Rear view.
Front view. It looks quite sloppy here but once the details are picked out it will look a lot more cohesive.
I'm looking forward to doing something similar with Haqqislam's other heavy infantry unit but using the AK interactive effect rather than Vallejo. I expect it will look much much better!

5. Played some games!

I've actually been playing Infinity quite regularly at my local and I'm really pleased that my hobby work is being used on the tabletop so frequently! There's currently a large casual campaign being run by Corvus Belli and Beasts of War called "Strikezone Wotan" that is really encouraging people to get out and play. People upload battle reports for various theatres of war which impact the overall narrative of the campaign!

I represent the Yu Jing forces with my Japanese army sectorial and you can check out my battle reports and profile here.


Well with that you're all caught up on my hobby times. Thanks so much for looking! 😄

Tuesday, 21 February 2017

How to choose a great Color Scheme for your Miniatures

Thinking about color-schemes is one of the hidden gems of the miniature hobby that doesn't require much energy but will make a huge difference in terms of your painting (and maybe even your personal life!). It has gotten to the point where my desire to try out new color schemes is one of the primary reasons i'll go out and buy a miniature. It becomes fun to think about various color combinations and I've often found myself taking pictures of objects, settings, or art I encounter in my day-to-day life that have a color palette I find really appealing.

To that end I thought I'd give you some basic points to think about when you're trying to come up with an original color scheme for your miniatures along with an example of my own practices when figuring out a scheme.

Complementary Colors: This is some really basic color theory, there are tons of articles out there which explain this better than I could, but suffice to say that a really good starting point when constructing a palette is to look at a color wheel and check complementary colors. These are constructed by drawing a straight (or nearly straight) line across the the wheel between two colors. Complementary colors are a great way to give yourself a really satisfying choice of primary colors (the most prominent/notable colors in your scheme) to build your palette off of.


These work especially well for miniature painting because you often want your figures to really pop on the table and you can go for really intense complimentary colors that you wouldn't typically see. Such as a deep purple against a light green:
A good example of complementary colors between the purple sword and green armor.
Shades of intensity (hues): Obviously you don't always want the brightest possible colors on your miniatures so keep in mind that you can vary up the level of white and black in your chosen primary colors to make them darker or lighter. For example: green and red are a complementary color but tend to make your figures look like Christmas decorations if you go for really pure and bright versions of both colors, but a really dark or muddy red can pair beautifully with a strong green to give you a much more realistic looking earthy tone.

I often find it helpful once I've settled on a set of 2-3 primary colors to look through the hobby paints offered by various companies to give me an idea of the different variations in shade and brightness I have access to. Keep in mind that you will typically want to build a strong contrast from dark to light for every color when you're layering and highlighting your miniatures, so pushing some of the base colors into a darker tone can make it much easier to highlight upwards. This is true even if you want a really bright overall effect.

Warm and Cool: If you don't like the idea of really strong complementary colors there is another way you can think about the color wheel. Namely a broad distinction in color theory between "warm" and "cool" colors that tend to connote certain feelings. This idea comes up in fashion a lot, with "cool" colors being prioritized in most professional attire as they connote a sort distance and logical exterior. That's why you'll see a lot of blues, greys, and light pinks, in the workplace with just a splash of warmer colors here or there. Whereas warm colors tend to be a bit more earthy and insinuate a more naturalistic environment.

Since we don't tend to dress ourselves with really strong or vibrant color combinations in our day-to-day life we often unknowingly use ideas about "warm" and "cool" color combinations that are analogous (similar tones that are next to each other on the color wheel) to help imply a certain attitude in our day to day life.

Neutral colors: These are colors that are not present on the color wheel and consequently can be used to accompany and accent the complementary or analogous schemes you come up with. These can make great tertiary colors to pick out smaller details on the models without clashing or upsetting the balance of your main colors.

Broadly speaking there are only four neutral colors: Black, Brown, Grey, and White. However any sort of color combination you can achieve with these four shades is considered neutral, and consequently you have a huge variety to choose from when finding something that will accompany your main colors.

All of these are very neutral colors
Keep in mind that brown tends to be a warm neutral color whereas grey tends to be a cool one. Most metal paints fall under the neutral umbrella as well, with gold/copper being warm and silver/steel being cool. Pure black and pure white never clash with any color scheme and can be used anywhere, although be aware that they are such strong tones they can easily dominate the overall colors of your model.

You can, of course, also choose to use a neutral color as one of your primary colors, which gives you a lot of leeway when choosing the 2nd, 3rd, or 4th colors on your figure.

Studio color scheme from Infinity.
The above image is a great example of using a neutral primary color (in this case white) while still getting some nice complementary tones out of the 2nd and 3rd colors. Note that the red and green color combination doesn't feel like a Christmas decoration at all, owing to the strong overall presence of the white.

Bases are a color too!: When designing your color scheme make sure you put some thought into how you will base your models, as the colors present in the base can be used to compliment or contrast the scheme of the model. For example you can paint your figure with one primary color and still get a really strong complementary effect by making your base it's opposite on the color wheel.
Teal and orange(ish)
Purple and green.
These guys are based using a darker/warmer tone of a similar color to set off their desaturated look.
You can also base for cohesion, in which the base becomes an extenuation of the colors present on the figure.
A good example of basing for cohesion with similar tones/shades present across the piece to tie it all in.
Finally you can also choose neutral bases that simply aim not to clash with your figure's colors. (A grey urban "rubble" base is a typical example) This is an especially good idea if your miniature has a lot of different strong colors on it. Your base color will make a huge difference in the overall appearance of your figure, so choose carefully! For more information you can check out my roomate's great blog articles on basing for contrast and basing for cohesion.

Some colors are easier to paint: For beginner-to-medium skilled painters there are certain colors that are just difficult to paint on miniatures. This is primarily because it's tough to get a nice level of contrast out of them. Contrast is the movement from dark to light as you go from the deepest details of the miniature to the highest ones in a way that mirrors the way light plays upon different colors in real life. In miniature painting we frequently push contrast to extremes in order to really make a miniature pop out on the table, not only in terms of our color combinations as mentioned above but also in terms of how each color moves from dark to light on the figure.

There are a few colors where it is objectively easier to get this contrast, and a few where it's objectively harder. Typically cool colors like blues and purples are really easy to get a nice contrast out of, whereas warm colors like red, orange, and yellow are more difficult. If you're employing a lot of warm colors but you still want a lot of contrast make sure you plan your shading/layering process carefully so you know how you'll get it.

A great example of this is trying to highlight red, as it tends to gradually turn into either pink or orange tones depending on what paints your using to lighten the color. Careful that you end up with a highlight you're happy with!

To give you some instances of how color schemes can be structured I've included a few palettes bellow...

Example #1: Complementary Color
Primarily a complementary contrast between an olive-green and a deep purple, which would go over armor or the main articles of clothing with a nice cream color as a tertiary option for extraneous clothing or leathers. The yellow would be a metallic gold for metals that compliments the warmth of the olive/cream notes.
A good example of how the scheme fits together.
Example #2: Neutral as a Primary Color
Black is a dominant neutral color here, but allows us to get some really strong complementary colors going on in the background between the teal and the orange. The deep red  can be used for further detailing as it complements the teal and is analogous to the yellow.
The image I based the above scheme on.
Example #3: Analogous Colors
This is the only palette here I didn't design myself, but as you can see it gives an example of a very cohesive palette based on autumnal colors, all of which are very warm, earthy, and close to each other on the color wheel.
A good example of how this sort of color scheme might be translated onto a set of figures. Note that the painter still uses splashes of bright blue to get some strong complementary effects here and there, and uses very light neutral skintones and greys to avoid clashing with the primary red/gold patterns.
Thanks for reading guys! I hope some of you found this article helpful and that my scatter-brained tips will help you see the fun you can have with designing color schemes. See you soon!


Wednesday, 11 November 2015

Painting Experiment: Orange/Yellow Orks Part 2

I'm planning to run a Warhammer 40k escalation campaign with a narrative focus next February. To that end I have to decide on a army to build and paint for it and, because i'm a masochist, I've elected to go for Orks rather than the using the Grey Knights I've already completed. While I love the Grey Knight models the fluff and character of the Ork army is vastly preferable to me. I love custom armies with a great backstory and a focus on having fun rather than winning games, and the Orks are all of these things to a tee!

After the (relatively) successful experiment with orange skin I spent a lot of time agonizing over a color scheme to accompany it. I settled on a bright turquoise produced by Scale 75 and tested it on my original model here.


Turquoise is exactly opposite bright orange on the color wheel and compliments it very nicely. So I quickly moved to get some actual 40k orks to test the scheme on. Thankfully a mate of surgical fame had a partially-used pack of stormboyz he gave me to test my scheme on.

Initially things went great and I loved the way they looked with my orange skin.

The grot inside this rocket is probably my single favorite miniature of all time. I'm dead serious.
However after this it got a little complicated. 40k Orks have tons of different components slapped all over theme, especially these stormboyz figures, and it was tough trying to decide where the turquoise needed to be. I eventually added a secondary color and did the majority of their armor in black as its an absolutely neutral tone, and actually compliments the turquoise and orange quite nicely.


My plan now was to paint turquoise on the clothing and black on the armor with just a few small turquoise accents here and there. But unfortunately even this simple arrangement ended up looking a little too garish given how bright the turquoise i'd chosen was.

The jumpsuits are too much in that color.
To this end I decided to use a burnt umber over a good portion of the clothing to tone things down, and it ended up looking alright. This guy (exempting the red on the rocket) is probably the best indicator of where i'll go with things. Burnt umber clothing, black armor, and turquoise accents here and there in both areas.


Naturally I did some sponge weathering on their armor to give them that properly battered orky look. The black looks lovely with a bit of metallic sponged over it. I also liked the idea of them slapping turquoise paint over the black, which I managed to convey a bit with this guy's eye. I'm going to experiment with adding this sort of "handpainted" turquoise to the armor some more I think.


Unfortunately I messed up the bases after experimenting with different washes on each one. I'm going with a desert theme to accompany the orange/yellow skin tone since they are fungus after all! I'll be getting some new pigments to use on them and further dirty them up. I may also chose a different turquoise color that's slightly less in-your-face about things in order to tone down the palette a bit and make the orange stand out more.

Working with these guys definitely  hammered home how important it is to test your colour-scheme out on some miniatures before starting to paint your force properly. These guys haven't been washed or highlighted yet, or had their details picked out, but even going this far has given be a great understanding of what to do with my chosen scheme. Next up, an Ork battleforce! (And painting a GK librarian when I get bored of assembling things)

Thanks for looking guys!

Completed Project: Grey Knights Terminator Squad

So at long last I have finished my unit of Grey Knight terminators after about a month and a half of fiddling around with them at a very casual pace. I was definitely slowed down by using so many unfamiliar techniques but I'm quite pleased with the finished result! Here they are as a unit:


Some quick thoughts on the painting aspects that were new for me here and that I didn't cover previously. Firstly, oil washes. I was deeply impressed by the effect that oils gave and they were wonderful to work with. After gloss varnishing the models I washed the cream armor with a straightforward mix of burnt umber thinned with low odor mineral spirits. I immediately noticed that the oil wash pooled in the recesses far more neatly and the finish over larger patches of of the model was extremely smooth and there was no "blotchiness" or tidemarks that usually accompany an acrylic wash over a large section of mini.

This is after the oil wash dried. The lighting is poor but it gives you a rough idea of how natural it looks.
Furthermore, because the oil wash takes so long to dry (about twelve hours to be completely dry) you can push it around as much as you like and wash off sections with straight white spirit, which I did to make sure not to darken the models too much. You can even do this after its totally dry as well! The control you have over the wash is unparalleled and combined with what is already a smooth coloring the result is strong yet subtle. I have simply never experienced such a realistic-looking wash.

I will absolutely be returning to work with oils in the future, especially considering that its relatively quick to move into and out of them, a coat of gloss varnish, apply the oils, and once its try a coat of matt, and your done!

The final new technique I experimented with was the use of resin bases. I decided to keep it very simple and ensure the bases were relatively dark in order to draw the eye to the cream armor, and by extension how mangled it is! This follows from roomie Byron's excellent tutorial on basing either for contrast (as in this instance) and cohesion. I decided to use a few simple drybrush layers on the stone and some burnt umber pigments from Vallejo to keep the "dirtiness" consistent with whats on the terminator's armor. The resin bases from micro arts studios were a dream to work with and the texture is exquisite!

Bases as they appear in natural light.
Bases under fluorescent light that shows more detail.

The last thing I want to show is my attempt to hand-blend an intense blue into the eyes and nemesis force weapons. The eyes came out nicely but the swords were much more of a challenge. However with enough glaze medium and time I was able to bang out something reasonable. The final edge higlight of white along the edge of the blade was rather messy, but a blue ink glaze tied everything together nicely. I know the quality would have been far better and the process easier had I just used my airbrush to do it, which I did for the force hammer, but I wanted to set a challenge for myself as blending has always felt rather elusive to me, like something only pros do. The fact I can even blend like this though, (poor as it is) is a sign of just how far I’ve come, as this stuff seemed downright impossible to me even six or eight months ago.

The best of my hand blends.
The blend produced by the airbrush.

Anyways thanks for reading guys! Here's a few more pictures in different light. Looking forward to my next project!
The squad under natural light.

Single model under natural light.
Single model under fluorescent light.