My one hobby resolution for 2021 was to actually play some miniature games with people. This is something I hadn’t done at all since I moved to Canada three years ago, and now with the Covid-19 pandemic I’ve become keenly aware that it is a missed opportunity to socialize and get the most out of the all the work I put into these miniatures.
To that end I’ve begun thinking a lot about terrain and assembling some boards to play on, and this has led me to probably the single most extravagant hobby-based purchase I have ever made: a 3D printer.
What follows is a longform pro/con reflection on getting a 3D printer for your hobby. It is intended for those who might be thinking about it but haven't necessarily taken the plunge. I also encourage people to check out Squidmar Miniature's excellent video on the topic.
There are two types of printers each with their own advantages and disadvantages. FDM (plastic) printers use plastic filament that is heated up and printed out layer-by-layer. Plastic filament (PLA) is relatively cheap to buy and they can easily print large-scale projects. SLA (resin) printers use liquid resin that is exposed to UV light to form miniatures, and can produce extremely high-quality prints but at a much smaller scale.
I purchased an Ender 5 Pro, which is an FDM printer. The printer itself is one-step above most budget options and cost me around $450 CAD. I have used it primarily for making terrain pieces.
 |
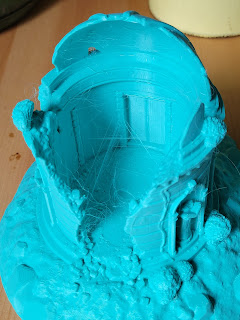
| My printer, chugging along with a print today. |
Why you should totally buy a 3D printer as a Hobbyist
1. The obvious answer here is the ability to create an indefinite amount of terrain or miniatures at an affordable cost. 3D printing has come a long way in the last ten years, so the quality of these prints has the potential to be extremely high and there is a lower barrier to entry than ever before.
2. From a terrain perspective, you can create really consistent pieces in terms of scale, durability, and visual themes. You won’t have to contend with mismatched pieces from different brands, or the cost of buying everything from a single high-end manufacturer like Game Workshop or Tabletop World. It's extremely satisfying to plan out the terrain for your board and find the perfect pieces from different designers.
3. There is no requirement to be able to design components or pieces yourself. There's an enormous amount of free designs floating around on sites like thingiverse.com, and there are many companies making affordable and extremely high-quality miniature and terrain files that can be purchased and then printed as many times as you want. Additionally, when it comes to printing terrain most of these pieces don't require the use of "supports", which are excess material used to hold parts of the print upright and which must be removed by hand after.
4. For miniature hobbyists, the fact that we clean up imperfections in our models and then paint them means that it is very easy to compensate for less-than-perfect 3D prints. Many other print users have to spend tons of energy chasing flawless print results that we don’t necessarily need to worry about as much, since we’re happy to fill a little gap or trim some excess before we cover the whole print in paint anyways.
5. Having checked the rates for my local maker cafes and online printing services (where you bring in your own files to print) I can say definitively that, at least for printing terrain pieces, you should not use these services. Terrain printing at the 28mm scale uses a lot of material and tend to take a long time. Before buying my printer I played around in various slicer softwares with free print files to get some numbers to crunch, and realized that in most cases you will end up spending more on terrain from a printing service than if you had just bought something equivalent off-the-shelf at your LGS. This is true even when compared to expensive terrain makers like Games Workshop or Tabletop World.
6. FDM printers specifically have a lot of utility for hobbyists outside of printing terrain or miniatures themselves. As a result of the strong overlap in hobbyist communities between miniature gaming and 3D printing there are an enormous number of storage solutions, painting optimizers, and all sorts of game aids that you will likely find genuinely useful. A good example is movement trays, which FDM printers are very efficient at spitting out quickly and easily. There are countless Etsy shops geared towards miniature wargamers that are effectively just someone with an FDM printer churning out prints.
7. 3D printers are a relatively compact way to produce quality terrain pieces. You need space for the printer itself and the models you produce, but that’s pretty much it. A full handcrafting/workshop setup is simply not viable for many people who might otherwise be inclined to build their own terrain. I live in an apartment and don’t have a car, so I was never going to have the space or supplies to build my own terrain by hand.
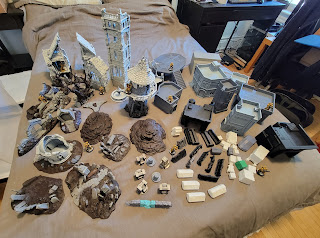 |
| My printed terrain so far, Primaris marines for scale. |
These pieces were printed over the course of a year, but were really just 2-3 bouts of intense printing for a week or two, with my printer otherwise sitting unused. This represents a little over half of the total printing I've done, with the rest being miniature or boardgame inserts or optimizers, and some pieces for the printer itself. You could easily make ten times this amount if you were printing with more consistency.
Why you should totally not buy 3D Printer as a Hobbyist
 |
| argh! |
1. You will spend a lot of time and energy getting good results. 3D printing is a hobby unto itself and for all of their recent development printers are nowhere close to a “pickup and play” purchase. You should expect to spend many hours calibrating and learning about your printer in order to get consistent results, and you will inevitably encounter problems that will require time and energy to solve. This is true even with really high-end printers. I agree with Squidmar's conclusion in the video I linked above: that printing is not something to be undertaken lightly despite its potential benefits.
2. While the upfront cost of a 3D printer tends to pay for itself after 1-2 boards worth of terrain or a few dozen miniatures, printing is still not necessarily a cheap process. Unless you have 3D design skills you will likely end up spending money on .stl files designed by professionals in order to get good results and cool terrain pieces, and then paying for your printer’s material usage on top of that. As a rough estimate I would say that for 32mm scaled terrain your total cost for a big centerpiece will be roughly $30-50 Canadian, depending on the cost of the file and filaments. Smaller terrain pieces are a little better in terms of cost, and that amount of money could easily print 2-3 boards worth of repeated walls/fences/etc.. Additionally, you'll probably want to have some spare components for your printer and minor quality-of-life upgrades that will add $50-200 to your initial printer purchase depending on how much you plan to tinker with the base model.
3. It takes a long amount of time to print terrain with any degree of quality. A basic single-floor medieval cottage or house such as this one printed at 28-32mm scale is typically over 25 hours of printing time. You will need to be patient. A full 6x4 board for 40k or AoS game with 4-5 decently sized pieces and some tasteful scatter will likely take around 150-250 hours of printing to produce with a standard printer. There are a lot of variables you can adjust to make this faster, but it will never be really quick.
 |
| Current record for my longest print time - 33 hours |
4. This problem of print times is compounded by the fact it is not a great idea to leave your printer alone while printing for extended periods of time. These machines use a lot of energy through their heating elements, and while most printers now have safety features like thermal runaway protection which will shut it down if it stops being able to read the temperature, they are still a minor fire risk. Additionally, if you don’t keep an eye on your prints and something goes wrong you will waste a lot of time and filament on a big mess. From a safety perspective I would think of 3D printing like slow-cooking something in your oven. You can certainly leave it alone for an hour or two but its not something you ought to leave running for a whole day without anyone there to monitor it. I've started using a remote camera app and an old smartphone on a tripod to monitor my print, and never leave my home for more than 1-2 hours when printing something.
5. FDM printers will never generate the same level of quality as traditional resin casting or injection-molded plastics. This is due to the little striations or ‘layer lines’ you see with FDM printing. Removing these takes a lot of effort, especially on large terrain pieces without flat surfaces. Additionally, they impact how you approach painting the pieces, as washes will not work the way you want them to (drybrushing and airbrushes are very much your friend with these prints). Frankly, with the amount of terrain you need for a miniature gaming table and how unnoticeable they tend to be I don’t think it’s worth the time investment trying to get rid of these layer lines. It is possible to make these lines finer and less noticeable when printing, but it will add significantly to your print time. That said, if you wanted to bulk-print miniatures or 3d tokens for use in boardgames and the like, I do think an FDM printer would be fine. Yet for anyone who cares about painting miniatures the quality simply isn't there.
6. Resin, on the other hand, can produce quality that is equal to resin casting or plastics molds. It can do much finer and more detailed layer lines, and you can even use alcohol or other solvents to remove these lines entirely. Yet the liquid resin used to print pieces is more expensive than the plastic filament used for FDM printers. This makes it far less viable for printing lots of terrain pieces. Additionally, the resin fumes are highly toxic and you will need a dedicated printing space to safely use them.
7. It adds to your painting backlog. Much like buying minis, its dangerously easy to find cool STL files you're really excited to print, but once you've got the model in front of you you're already preparing to print something else. The result is a pile of awesome plastic that tends to build up in your closet just as quickly as any other element of the hobby.
Examples
Ruined Belltower

After getting to grips with my printer and establishing consistent results his was my first big project. It is a huge centerpiece model that prints in eight parts.
By-and-large these came out pretty nicely, although the quality was sometimes a little inconsistent between pieces due to small changes I made in the print settings. I did have to do some minor cleanup on all the pieces, in particular getting some of the tower sections to fit together nicely required a bit of shaving/sanding on my end.
In total, the belltower used up roughly one $35 (cad) spool of filament, which is 1kg of plastic. I had already printed a few things with the grey filament so I had to change it halfway through. The blueprint files were purchased off of Printable Scenery for $15 (cad) and in total this represents about 125 hours of printing time.
These are pretty good results for attempting a first major project, which I chalk up to a combination of luck and competence.
A model of this size and detail would easily cost at least $150-250 (cad) if you were to buy it off the shelf. Consequently, it only takes a few prints like this to earn back the cost of a budget printer. In my case I just had to print the equivalent of one or two more of these and I’d pretty much earned back that initial cost.
Failed Prints
 |
| *screams internally* |
What happened: I had dialled in my settings perfectly and was getting great results, but on this particular print the nozzle that pushes the melted filament out began knocking against the already printed pieces as it moved around. After enough minor hits it ended up snapping one of the columns off at the base, which would have turned the rest of the print into a mess of plastic spaghetti so I had to stop it.
To fix this, I’ve added ‘z-hop’ to my print settings, which means the nozzle will move up a little bit while it travels across the print. This fixes the issue of the nozzle hitting the print, but has given my prints ‘stringing’ where filament oozes out of the nozzle as it moves to make these little cobwebs.
 |
| Example of 'stringing' in a print after this setting was introduced. |
Scatter Terrain

Scatter terrain like this is absolutely ideal for 3D printing. I purchased the blueprints for the wall sections on the left for $15 and they contain a whole bunch of different wall sections including curves, intersections, etc. You also print out the terrain locks that makes them modular and they work very well.
Small detailed pieces like this would be a pain to handcraft and pricey to purchase enough of to fill a board, so these are the best use-case for 3D printing I’ve come across. Everything seen above prints in 1-2 hours, and with a single roll of filament I expect you could print 1-3 boards worth of walls or scatter depending on the density required by your game.
Monster Miniature
 |
| Note this is a large figure, the base pictured here is 100mm wide. |
| Some further details, including the remains of the supports on the bottom of the print. |
Inserts, Organizers, & Optimizers

Unsurprisingly the overlap of people with 3d printers with people who tend to like boardgames is a nearly perfect venn diagram. There are countless free prints that provide optimized storage solutions and inserts to boardgames that are otherwise difficult to set up or store, or which don't have enough room for sleeved cards.
Above is an example of one that I've printed for the lovely little game Root. My inserts allow each faction to have a self-contained box of just their pieces, and let me store all the expansion content in the original box.
These are not a hugely important or useful thing to 3D print. It is certainly cheaper than buying premade custom inserts for games (which tend to cost about as much as a game themself), but either option likely only saves you about 2-5 minutes of setup time whenever you opt to play a game. That said, it is definitely extremely satisfying to open a box of your favorite game and see everything neatly laid out like this. :)
Final Judgement
I’ve really enjoyed my 3D printing experience so far, and I am looking forward to being able to use these prints to motivate me to get some games in. That said, it’s been a lot of work and mental energy, and my results have only been as good as they have due to my slightly obsessive focus on it. This has been accentuated by the fact I’m working remotely and therefore always home to tweak and monitor the printer. Consequently it’s not something I would recommend lightly to people, and I emphasize again that buying a 3D printer means you are starting a new hobby, not just supplementing your current one.
With that caution in mind I definitely think they are worth considering if you need 2+ boards worth of good quality terrain. Particularly for systems that benefit from a lot of scatter terrain like Infinity. Past this point a printer makes a lot of financial sense especially if you don't have a lot of space. I am less sure about what the metric would be for SLA printers and how many miniature you need to print, but I'm sure they earn their cost back fairly quickly as well.
If you want to print terrain, get an FDM printer. If you want to print miniatures, consider an SLA printer. If you want to print both be prepared to be a little unsatisfied with the results of whichever one your printer is less capable of producing as you'll either have fine layer lines on FDM miniatures, or pay a lot of money for resin to cast terrain on an SLA.
Handcrafting still remains the cheapest way to acquire high-quality terrain, but requires space, materials, and skill. Buying terrain in-store is very costly but sidesteps all of these issues. I would encourage you to think of 3D printing as operating in a middle ground between these two in terms of cost and personal investment to produce good results.
Thanks for reading guys!
-Tom


:strip_icc()/pic5379057.jpg)